By far and away the most commonly purchased Moka Pot are the Bialetti Moka Express Pots. I even I reviewed the Bialetti Moka Express a while back and gave one away soon thereafter to a reader but there are plenty of other similar moka pots out there made both by Bialetti and many other top brands like Primula, Cuisaid, and others.
The Xresso Stove-top moka pot by Cuisaid is very popular as is the more expensive Brikka and Venus models by Bialetti. Additionally there are countless off-brands that make essentially unbranded and “generic” moka pots.
The purpose of this guide however is not to tell you which moka pot to buy but rather to explain to you how to use a moka pot to brew coffee because they all make coffee almost the exact same way.
You fill the lower chamber with water to just below the pressure release valve and add medium-fine coffee grind to the inner filter basket. The grounds must be level and fully fill the basket without being tamped down. Ensuring the gaskets are in place and the top chamber is screwed on tight the pot is placed on medium-low heat until the coffee flows into the upper holding chamber.
Basically you don’t want to use too little water, too little grind, too course grind, and you don’t want to use heat that is too high…and once the coffee is brewed you don’t want to leave it on the burner any longer than is necessary either.
If you don’t yet own a moka pot you can see my review of the Moka Express here or you can see the following page to see my list of the best stovetop espresso makers.
With that summary out of the way let’s look closer at the differences between all the various types of moka pots and dive deeper into the intricacies of making good moka vs bad moka.
Common Features Of Different Moka Pots Explained
Although each moka pot is slightly different in build and style, and although some are made sturdier than others, they all generally work the same way and their instructions for use are nearly identical.
- You put water in the bottom up to a fill line.
- You put coffee grounds in the middle filter basket.
- You put the assembled pot on the stovetop on medium to low temperature and wait for coffee.
If you are reading this page however you probably actually own a stovetop espresso maker already though and are trying to figure out to use it. The above list is just the summary; there is a lot to say about every step and I intend on giving you a deep explanation on each aspect of moka pot brewing techniques if you keep reading.
If you’ve ever seen one of these things in action then you can probably get a feel for working them yourself in virtually no time. Honestly just watching a YouTube video is probably all you need too get a good idea of what to do yourself.
Also, it’s worth noting that each pot will brew coffee at a different rate depending on the size of the brewer and the grind size you are using. See this post for more on that concept.
Please check out the following video which will prime you for more detail than you might need or want… all in the interest of making better moka from a stovetop espresso pot, regardless of the brand.
How To Use A Bialetti Moka Express Stovetop Espresso Maker
Even if you watched the video there are some important things to know that aren’t covered in the video.
There are no Half-Pots: Brew With a Full Water Chamber Every Time
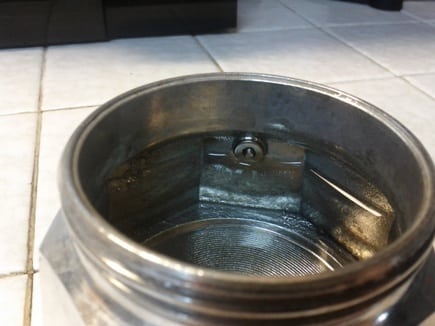
To summarize the process just know that on a Moka Express or similar stove-top espresso pot you need to fill the water to the fill line every time. You never use less and you never use more. It is built for one level of water.
Some models have an identifiable fill line but models such as the Bialetti Moka Express and Brikka the fill line is not indicated by anything other than the pressure release valve. In short the release valve is the fill line and you never fill above it – always fill to just shy of the valve as depicted in the picture at left.

Fill the Filter Basket Flush to the Top Every Time
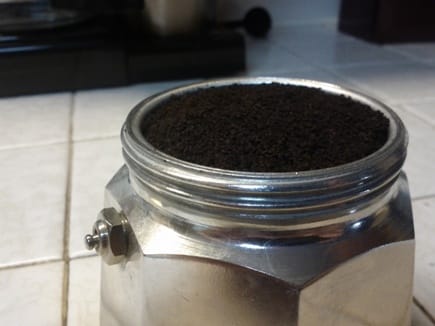
Another point of use to keep in mind is that all Moka pots have a basket sized perfectly for the quantity of water you put in the base. You need to fill this all the way to the rim and keep it mostly flat to get the best extraction of coffee possible.

There is more wiggle room for this point that the water fill line – you can put slightly less grounds in the basket but not too much less. The grounds act to increase the pressure in the brewing process. If you have less grind in the basket the brew will come out weak and fast.
On the flip side overfilling the grind chamber (or tamping it down) will cause the brew to be bitter and slow to produce. If you really fill this basket too high then you may even clog the upper filter screen which leads to the finished coffee basin. Clogging this will result in much slower brew times and over-extracted, very bitter moka coffee.
Do Not Tamp Down
Some people tamp the grind down but you do not need to do this and tamping it down too much can increase the pressure in the pot more than is safe or ideal for best flavor.
I tend to fill my grind basket to just barely heaping and then flatten it out with my finger. This results in a full basket that is not mounded in the middle or shallow on the sides. It also gives me a full basket that is not overly compacted.
Brew on Low/Medium Heat: Not High
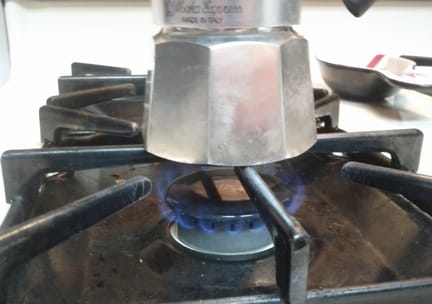
Lastly the brewing process takes place on a stove top (or a boiler plate with a few select models). The best brew will come from a moka pot set to medium low heat. The slower you heat the water the better the brew will come out the top side.

Yes, brewing on high will result in a faster cup but you run the risk of making bitter coffee, burning the handle, breaking down the rubber gasket that seals the top of the pot to the bottom, and even releasing the pressure valve on models that have such devices.
High temperatures are also more likely to result in boiling coffee on the top side which is not good either. If your coffee comes out the top and starts boiling before you turn off the heat then it will reduce, burn, and generally lose that awesome flavor you’re going for. After all, why else would you use a moka pot if you didn’t care for the best coffee flavor you could possibly produce.
Make Sure the Grind Size is Medium/Fine: Not Espresso
As for grind size, some people prefer a fine espresso grind while others prefer a medium to coarse grind.
In all honesty it really doesn’t matter that much because these sizes are personal preferences but most people find the size between drip and espresso to be best because it causes the right amount of resistance during the brewing process to get the best extraction of desirable flavors from the coffee.
I’ve used all different kinds of grind size though and they are all similar. I’ve found the main thing that should be avoided is the tamping.
So long as you don’t tamp your grind too much the brew will come out great on the other side. Experiment and find what you prefer best. For me like the majority of others it’s something between espresso and drip. of course you’ll probably want to use your own grinder to get this or just use this pre-ground stuff from Lavazza which I find to be perfect right out of the bag.
Here are some great grinders that I’ve reviewed if you are interested.
If you are new to brewing with moka pots and found this post useful then make sure to read the following post on cleaning a moka pot.
If you end up liking your moka pot a lot then make sure to look at these insulated espresso mugs which keep your moka hotter a lot longer.
You can continue learning more about moka pots and making stovetop espresso on this site. I’ve provided links below to a few other popular articles on brewing moka better:
► Stainless Steel vs Aluminum Moka Pots
► How Stovetop Espresso Makers Work
► How Long Do Moka Pots Take To Make Coffee
I’ve also selected some of the better moka pots to buy from a few different hard-to-shop-for categories. You can see those buyers guides below.
► The Best Stainless Steel Moka Pots
► 1-Cup Moka Pots
► 2-Cup Moka Pots
